

Consuming a JSON REST API in Android

This week’s blog post was requested by one of our readers, Jasmine.
Jasmine asked if I could write a guide on “processing JSON data for android applications using NodeJS and Express and Android Studio”.
I haven’t done anything using Android Studio in a while – and I love writing guides that you all want and need – so I thought I would give it a shot.
There are two parts to processing JSON data in Android using NodeJS and Express:
- Writing an app capable of processing the JSON data.
- Writing a backend capable of producing the JSON data to be processed.
Because there are two parts to this, naturally I’ve broken the steps down into two blog posts.
In the first guide – i.e. this one – l’ll walk you through step #1 and teach you how to create an Android app using Android Studio, which allows you to process JSON data from a REST API.
The next post will show you how to make a REST API using NodeJS and Express. (Check back next week, or better yet, sign up to my newsletter).
Alright, so let’s get started.
In this guide I’ll teach you how to make an Android app which uses the latest Volley HTTP library and allows you to efficiently make network requests and handle the response.
The app will have a text field where you can enter a GitHub username and a button that will retrieve a list of all public GitHub repositories for the provided username.
The repos will be listed in a text box with the name and last updated date.
Create Our App
Open up Android Studio and create a new project.
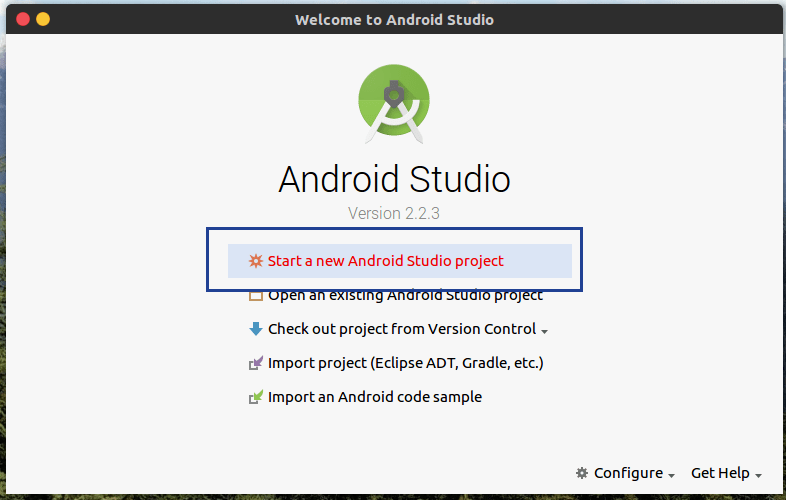
Next, fill out the new project form by entering the following:
Application Name: AndroidJsonParser
Company Domain: (Your company domain, or if you don’t have one, use example.com).
Then, click Next.

In the Target Android Devices screen, leave everything as default and click Next.

On the Add an Activity to Mobile screen, choose Empty Activity and then click Next.

On the Customize the Activity screen, leave everything as default and click Finish.

Wait a minute or two for the project to load…
Enable Volley and Internet Access
Let’s add the Volley library to our project.
In the Project Explorer, navigate to Gradle Scripts > build.gradle and add the following to the dependencies:

Save the file.
Then, in the Project Explorer navigate to and open app > manifests > AndroidManifest.xml.
Just above the application tag, add the following line to add the INTERNET permission:

Modify the Layout
Next we are going to want to add the following elements to our activity layout:
- EditText for a GitHub username
- Button for getting the data once the username is entered
- TextView for showing our results
That’s the minimum required for an effective demo.
In the project explorer, navigate to app > res > layout > activity_main.xml. Once the file opens, select the Text tab at the bottom of the screen.

Now, let’s remove the existing Hello World! text view, and add the following code:

Write our Java Code
Now, let’s write the logic for our app.
The first thing we’ll do is import the packages we need to make our app work.
You can actually do this as you go along, using the Alt + Enter shortcut to auto-import. However, I found this didn’t work for all of the imports (some of the Volley and JSON packages I needed to import manually).
For simplicity, lets delete any existing import statements, and replace with the following (note: make sure you leave the package declaration on the first line, as this will be different for each person).
It will look something like this

The reason some are grey is because Android Studio is letting us know which ones are unused. Don’t worry, we’ll use them later.
Now let’s add some instance variables. Instance variables are defined when we initialise our app. These variables are used in various methods later on in the code.
We define them immediately below the “Public class MainActivity…” and above the first “@Override” statement:
So our code now looks like this:

Getting there…
Next, let’s update our “onCreate” to register our views and setup our queue. As the name suggests, “onCreate()” is the function that is created when our Android Activity (the screen in-front of our code) is created.
We need to link the view elements we created earlier (the text input, button and text output) with the instance variables we defined above, so we can use them in our code.
Update the onCreate method to look like this:
So now our code looks like this:

Next, let’s add some helper functions to our code.
I described what each function does in the comments block.
Insert the following below the onCreate() block which we just updated (below the end bracket):
So the code will look something like this:

Alright, so this is the part where we make our HTTP request.
Insert this code underneath our last function (setRepoListText). This code might look confusing but it’s actually quite simple. I’ve described what each section does in the inline comments. If you want to gain a more in-depth understanding, I highly recommend you read the official guide Transmitting Network Data Using Volley.
Now our code looks like this:

One final code change to make. You may have noticed above that in our Layout Snippet we added the following on line 25:
This basically tells Android that when the user clicks that button, call the getReposClicked() function in our app.
So the last step is to define this function.
Add this code below the Volley function we just added:
Now the code looks like this:

Alright, the code is complete!
Test Our App
Finally, let’s test our app.
At the top of Android Studio, click on the play button:

In the Select Deployment Target screen, choose either a Connected Device (if you have a real Android Device that you use to test your apps on), or a device under Available Virtual Devices.
If you don’t already have a device setup, then you can click on Create New Virtual Device and follow the steps on-screen to create a new one.

Alright, once that’s done, your app should load on the selected target.
Test it out! Enter your GitHub username and watch it retrieve a list of all your GitHub repos right before your eyes.

I hope this helped Jasmine?
If you have any questions, feedback, or want me to cover a specific topic, please let me know in the comments below!
Cheers
Mark


hello
thank u for your useful tutorial
i have problem with compiling volley
compile ‘com.mcxiaoke.volley:library:1.0.19’
and i added this
compile ‘com.android.volley:volley:1.0.0’
and the error solved
but when I want to run the project 2 errors appear as below:
Error:(75, 35) error: no suitable constructor found for JsonArrayRequest(int,String,<anonymous Listener>,)
constructor JsonArrayRequest.JsonArrayRequest(String,Listener,ErrorListener) is not applicable
(actual and formal argument lists differ in length)
constructor JsonArrayRequest.JsonArrayRequest(int,String,JSONArray,Listener,ErrorListener) is not applicable
(actual and formal argument lists differ in length)
what should i do?
a null is missing in third position
JsonArrayRequest arrReq = new JsonArrayRequest(Request.Method.GET, url,null,
hello
thank u for your useful tutorial
i had problem with compiling volley
compile ‘com.mcxiaoke.volley:library:1.0.19’
and i added this
compile ‘com.android.volley:volley:1.0.0’
compile ‘com.mcxiaoke.volley:library:1.0.19’
and the error solved
but when I want to run the project 2 errors appear as below:
error1:
Error:(75, 35) error: no suitable constructor found for JsonArrayRequest(int,String,<anonymous Listener>,)
constructor JsonArrayRequest.JsonArrayRequest(String,Listener,ErrorListener) is not applicable
(actual and formal argument lists differ in length)
constructor JsonArrayRequest.JsonArrayRequest(int,String,JSONArray,Listener,ErrorListener) is not applicable
(actual and formal argument lists differ in length)
error2:
Error:Execution failed for task ‘:app:compileDebugJavaWithJavac’.
> Compilation failed; see the compiler error output for details.
what should i do?
when you use “compile ‘com.android.volley:volley:1.1.0′”
use this code instead :
JsonArrayRequest arrReq = new JsonArrayRequest(url,
new Response.Listener() {
@Override
public void onResponse(JSONArray response) {
// Check the length of our response (to see if the user has any repos)
if (response.length() > 0) {
// The user does have repos, so let’s loop through them all.
for (int i = 0; i < response.length(); i++) {
try {
// For each repo, add a new line to our repo list.
JSONObject jsonObj = response.getJSONObject(i);
String repoName = jsonObj.get("name").toString();
String lastUpdated = jsonObj.get("updated_at").toString();
addToRepoList(repoName, lastUpdated);
} catch (JSONException e) {
// If there is an error then output this to the logs.
Log.e("Volley", "Invalid JSON Object.");
}
}
} else {
// The user didn't have any repos.
setRepoListText("No repos found.");
}
}
},
new Response.ErrorListener() {
@Override
public void onErrorResponse(VolleyError error) {
// If there a HTTP error then add a note to our repo list.
setRepoListText("Error while calling REST API");
Log.e("Volley", error.toString());
}
}
);
Hi, how to go for the second post.
i want to use https://jsonplaceholder.typicode.com/photos/ api and show the data in listview…..
can you please share the code for this
get sting value and use library is like glide or picasso etc..
am getting this error please “Error while calling REST API” What may be the problem
implementation ‘com.android.volley:volley:1.1.1’
you need too add null if you use the latest one from google
private void getRepoList(String username) {
// First, we insert the username into the repo url.
// The repo url is defined in GitHubs API docs (https://developer.github.com/v3/repos/).
this.url = this.baseUrl + username + “/repos”;
// Next, we create a new JsonArrayRequest. This will use Volley to make a HTTP request
// that expects a JSON Array Response.
// To fully understand this, I’d recommend readng the office docs: https://developer.android.com/training/volley/index.html
JsonArrayRequest arrReq = new JsonArrayRequest(Request.Method.GET, url, null, <– here
new Response.Listener() {
@Override
public void onResponse(JSONArray response) {
// Check the length of our response (to see if the user has any repos)
if (response.length() > 0) {
// The user does have repos, so let’s loop through them all.
for (int i = 0; i < response.length(); i++) {
try {
// For each repo, add a new line to our repo list.
JSONObject jsonObj = response.getJSONObject(i);
String repoName = jsonObj.get("name").toString();
String lastUpdated = jsonObj.get("updated_at").toString();
addToRepoList(repoName, lastUpdated);
} catch (JSONException e) {
// If there is an error then output this to the logs.
Log.e("Volley", "Invalid JSON Object.");
}
}
} else {
// The user didn't have any repos.
setRepoListText("No repos found.");
}
}
}, new Response.ErrorListener() {
@Override
public void onErrorResponse(VolleyError error) {
// If there a HTTP error then add a note to our repo list.
setRepoListText("Error while calling REST API");
Log.e("Volley", error.toString());
}
}
);
// Add the request we just defined to our request queue.
// The request queue will automatically handle the request as soon as it can.
requestQueue.add(arrReq);
}